Git(Lab) workflow
Access
Section titled “Access”In case you need access to a certain repo, consider applying for a role that provides access to the repos you need through the dcbot.
Committing Code
Section titled “Committing Code”At d-centralize, it’s highly preferred to create clean commits.
Creating clean commits saves both the author and the code reviewer time and makes it more likely the commit will get merged.
Do:
- Keep the changes small.
- Update documentation to match the changes.
- Add tests that would fail in the old situation, but succeed in the new situation. This is especially relevant if the change doesn’t decrease test coverage.
- Consider using
git add -p. This will allow the committer to only stage and commit partial file changes. - Consider squashing your commits if you went on a trial & error spree. It’s probably not useful to anyone seeing that.
- Adhere to the commit message conventions as described in Commit messages.
- Creating an issue is not always required. If the code change is small consider creating only a merge request.
Don’t:
- Add unrelated changes. This makes the change harder to follow for the reviewer and causes potential merge conflicts.
Branching
Section titled “Branching”For most projects we have three kinds of branches, a release branch (production)
a development branch (main) and feature branches. This is called the
Github Flow with a Production branch.
When working on an issue you’ll be working on a feature branch. Once it is ready you make a merge request in Gitlab to merge your feature branch into the development branch. You’re free to name the branch yourself, but it’s recommended to prefix the name with an issue number so Gitlab streamlines the creation of merge requests for you.
Then when the project is ready for a new release the development branch should be merged into the release branch. The latest commit on the release branch is tagged with the release version.
For projects that work with Coolify:
- Staging releases will be performed for every new push to the development branch (
main). - Production releases are performed for every new push to the release branch (
production).
Hotfixes
Section titled “Hotfixes”Normally, main merged into the release branch for new production release. However, when a lot of features are merged in main that are tested out on staging, there might be a need to get a subset of those commits in main out to production. For this we use hotfix branches which is created from the latest release branch.
In case the latest release was tagged as 1.5.9, create a hotfix branch 1.5.9-hotfix, branching off that tag. git checkout 1.5.9 and git checkout -b 1.5.9-hotfix. Cherry-pick the changes from a commit, an MR in Gitlab or through the cli command git cherry-pick into the above hotfix branch, git push origin HEAD:1.5.9-hotfix. Then merge the hotfix branch into the release branch.
- Don’t bother creating an issue if you’re just creating an obvious change that doesn’t need context.
Gitlab code review conventions
Section titled “Gitlab code review conventions”Gitlab facilitates a lot of automation so that once effort from a colleague is requested, most basic checks have been performed. For example, most projects will provide CI jobs for:
- Linting (automated code style checking)
- Spellchecking
- Testing (running unit tests and/or end-to-end tests)
While you’re working on the above, it’d be best to keep your code in a branch or an MR that’s marked Draft. This signals the MR is not ready for review yet.
As the author of the branch/MR, you’re responsible to get the MR green-lit.
Once the CI pipeline is all green, and you’re happy with it, you can:
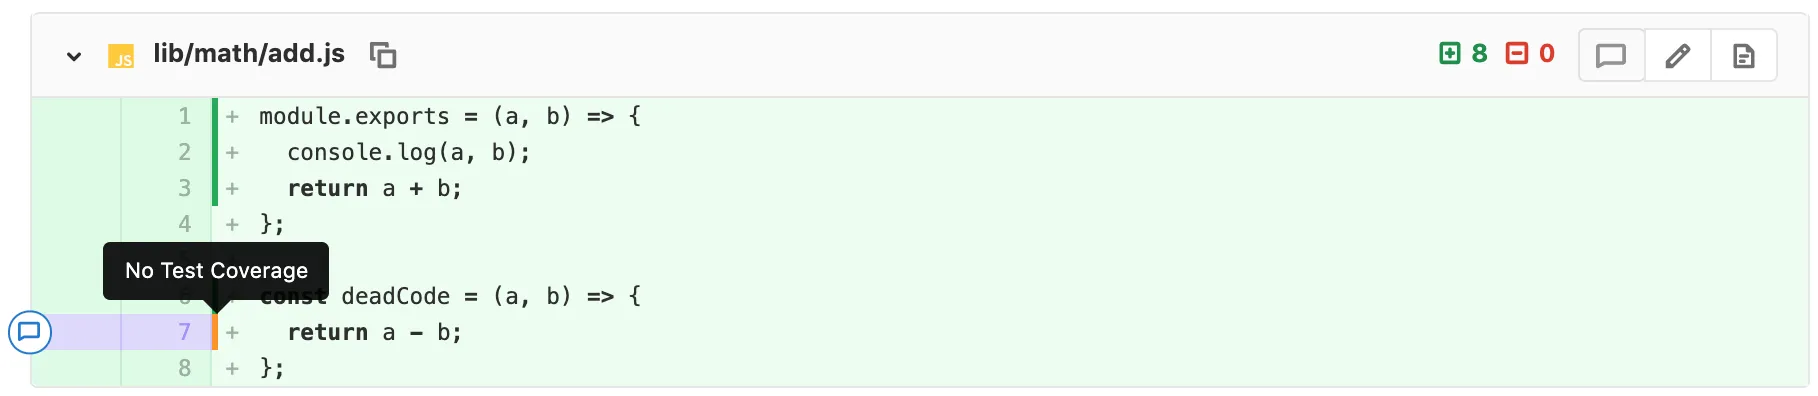
- assess your test coverage visualization. This works if the unit tests ran successfully and your project has coverage indication setup. Consider extending your test coverage if there are vertical red lines visible in your diff.
- wait for a reviewer to pick up the MR and provide you a code review
- if you’re in a hurry to get something merged, or you have someone specific in mind to review your code, assign that person as a reviewer to the MR.
AI review assistant
Section titled “AI review assistant”Some projects use dc-pr-agent to add AI feedback to merge requests.
Treat this as reviewer support, not as approval or a replacement for human review.
The assistant can post:
- a reviewer guide with likely focus areas;
- code suggestions from
/improve; - non-applyable fallback comments when Gitlab cannot attach a suggestion to an exact diff line.
Apply AI suggestions only after checking the code and tests yourself. A fallback
comment that says Cannot implement directly is still useful review input, but
needs to be applied manually if you agree with it.
Developers may explicitly ask for extra commands in an MR comment, such as
/review, /improve, /update_changelog, or /add_docs. Do not rely on AI
commands for merge readiness; the MR author remains responsible for a green
pipeline, sensible tests, and reviewable commits.
Signalling between author and reviewer through Gitlab mechanisms
Section titled “Signalling between author and reviewer through Gitlab mechanisms”Signalling Draft state
Section titled “Signalling Draft state”A MR can be in Draft state when the title of the MR starts with Draft:.
There’s a convenient toggle to set state of MR to Ready or Draft.
When a MR is in Draft state it’s not meant to be merged, that’s all it signals.
Signalling ready to review
Section titled “Signalling ready to review”Either of these signals send the signal a MR is ready for review.
- The CI pipeline passed and no reviewer has been assigned yet. The dc-bot will also assign a reviewer in this case.
- A reviewer has been assigned, no matter the CI pipeline status. Of course, to prevent wasting time of the reviewer, it’s strongly recommended to assign a reviewer only after the pipeline passes, but in case you’ve got reasons to ask for a review anyway, it’s also best practice to add a comment mentioning the reviewer to start reviewing despite the pipeline status or ask for help debugging the failed pipeline if that was your reason for review at this time.
Reviewing back and forth
Section titled “Reviewing back and forth”To make it crystal clear whether the author or reviewer is supposed to jump in action, define the following workflow.
Situation 1: author signalled ready to review, it’s not time for a reviewer to get started.
- In case a reviewer is happy with MR the reviewer may approve the MR. Through clicking the
Approvebutton or submitting/approvedin the comment box. Then the author may merge the MR. This is most ideal when author wants to sync the merge of this MR with other MRs in other repos, or when reviewer doesn’t have merge permissions yet. When the MR is trivial enough, the reviewer can decide to merge it themselves: saving everyone work. - In case a reviewer wants author to make modifications, reviewer should leave comments describing what needs
improving. Leaving not just a comment but also a code suggestion is always appreciated. When reviewer wants to return
the baton to the author, leave a comment with the
/request_changesdirective.
Situation 2: author is signalled to improve the MR
- The author can push additional improvements to the branch until author is satisfied and thinks reviewer will also be.
Then it’s time the author requests a re-review
by clicking the round arrow next the reviewer of submit a comment with
/request_review @the_reviewer. This starts a next iteration of the cycle going back to situation 1.
Processing comments
Section titled “Processing comments”Comments in the MR are left to the author to work on or respond to. Preferably related to a certain line so context
of the comment is clear.
Both the author of the MR and reviewer can and should resolve comments in an MR. It’s a joint effort.
In case of doubt, don’t resolve a comment but leave it to the other party. To prevent you’re both waiting for the
other party to resolve a comment, feel free to add another comment to it where you explain why you’re not ready to
resolve it and express your doubts. It’s good habit to include @username in the comment to make explicit at whom
you’re directing your comment. Especially in the case of multiple parties involved in the review.
Developer communication
Section titled “Developer communication”Assume no other developer will see your MR, issue or comment in Gitlab. If you want to draw attention to it, trigger one of the actions that create a to-do item for another developer. The to-do list should be something that every developer monitors.
Merging
Section titled “Merging”By default, the reviewer is allowed to merge the MR when accepted. In some project however (Appsemble), the reviewer is kindly asked to approve the MR and leave the merging to the author of the MR.
Self merging your code is generally not accepted. Within some projects where there are a lot of trivial bump MRs required, we leave the choice of self merging trivial MRS to the author.
Running Gitlab CI/CD job locally
Section titled “Running Gitlab CI/CD job locally”A lightweight alternative to consider before running a full-blown docker based CI job.
Reuse through scripting
Section titled “Reuse through scripting”Instead of putting all shell scripting inside the .gitlab-ci.yml job definition, you can also just use it to
execute .ci/some_script.sh.
Benefits of this approach:
- You can lint the script automatically.
- You can also locally call this script without the need of running in a Docker container (usually).
Some general advice:
- Stick with the most basic shell /bin/sh for scripts that just execute a bunch of commands.
- Stick with /bin/bash for scripts that need a little extra.
- Consider python if the script gets really big, complex or otherwise unreadable.
Issues
Section titled “Issues”What can be said about issues is mostly not Gitlab specific and mentioned in Scrum.
Described here is useful knowledge specific to (our) Gitlab instance.
Labels
Section titled “Labels”Labels can be used to categorize issues. But also to trigger behavior in dc scripts, the bot, and the recurring issues:
gitlab/focus_on_urgency.py
This script fetches issues from Gitlab with the Priority: Urgent label assigned. If any issues are open, they get
announced on Mattermost daily. For Appsemble it’s Prio::High and a daily announce on Discord.
gitlab/unblocked_notifications.py
This script fetches issues from Gitlab with the Blocked label assigned. If all the issues in “Linked Items” changed
status to “closed”, the Blocked label is removed along with a comment in the previously blocked issue.
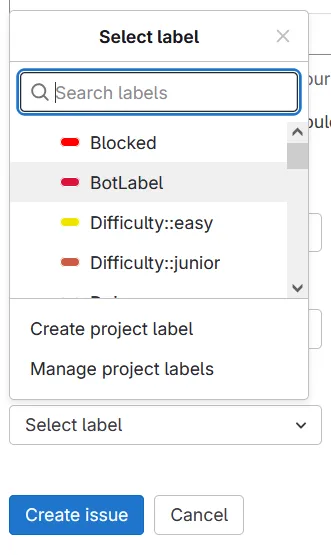
When applying labels to your issues, try to select one or more of the “standardized” labels as shown in the image below. Those are acted upon by several scripts. When you feel the need to express more context, create project-specific labels on project level that make sense in the project context. These are only for humans, scripts will ignore those.
Bot directives
Section titled “Bot directives”These labels can give the bot some hints in order to assign the right people to issues:
Difficulty::easy: not much in depth programming knowledge is needed for this issue.FirstContribution: same as above.Difficulty::junior: some in depth programming knowledge is required for this issue.Skill:domain: some domain knowledge is needed for this issue (therefore, it might not be ideal for people not familiar with the project)Skill:fullstack: to finish the issue, work in frontend and backend is anticipated.Skill:dbmigration: to finish the issue, a database structure change and/or migration needs to be performed.Priority::Critical: drop everything, work only on this. Use when the majority of users are severely affected by this.Priority::Urgent: top priority to process this issue above all others. Use when several users are severely affected by this.Priority::High: high priority to process this issue above all others, except for the Urgent priority labeled issues.Priority::Normal: normal priority to process this issue. Needs to get done at some point in time.Priority::Low: low priority to process this issue. Only work on this when Urgent, High or not prioritized issues are processed already.TechDebt: Issues related to technical debt, including code that needs refactoring, outdated dependencies, or improvements to maintainability and performance. These are not immediate bugs but should be addressed to ensure long-term stability.Bug: Reports of unintended behavior, errors, or malfunctions in the software that need to be fixed. Bugs can include broken features, incorrect calculations, crashes, or unexpected performance issues.Feature: Requests or tasks related to adding new functionality or enhancing existing features in the software. These issues typically involve development work to introduce new capabilities or improve user experience.Client: Issues, requests, or tasks specifically related to a client or customer. This may include client-reported bugs, feature requests, integrations, or customization needs.Type::internship: Issues that can be ignored by the bot due to being a internship issue.
There are also two other labels that the recurring issues scripts use to automatically make issues:
Type::cron-job: when you give this label to a issue the script will search for a cron statement. And based on that makes a issue.Bot::issue: This label indicates that the issue was made by the script.
These labels can also be found when typing labels to the Mattermost dcbot in Mattermost using a Direct Message.
Label Naming Conventions
Section titled “Label Naming Conventions”To ensure consistency and clarity across our GitLab instance, please follow these naming conventions when applying labels:
-
General Structure:
- Use capital letters for all labels.
and also with double colons (::)
separating the category and the label name (e.g.,
Priority::High). Or only the first word (e.g.,Bot::issue)- While we do use scoped labels (::), it’s a feature from a higher tier in Gitlab we don’t pay for. So they don’t work as expected. However, additional scripting will compensate for that. For example when a issue has both the High and Low priority it may remove one of those labels from the issue.
- Use descriptive, short names for labels that clearly indicate their purpose.
- No spaces between words in labels; use double colons (::) instead (e.g.,
Difficulty::Easy,Skill::Domain). - All “standardized” labels need to be made in the dc Gitlab group and not any of it’s sub-groups or projects.
- Use capital letters for all labels.
and also with double colons (::)
separating the category and the label name (e.g.,
-
Label Categories:
- Priority Labels: Use labels like
Priority::High,Priority::Low,Priority::Urgent, andPriority::Criticalto denote issue priority. - Difficulty Labels: Use labels such as
Difficulty::Easy,Difficulty::Junior, orDifficulty::Seniorto describe the complexity of the issue. - Skillset Labels: Use
Skill::Fullstack,Skill::Backend,Skill::Frontend, etc., to indicate the skillset required. - Status Labels: Use
Status::Todo,Status::InProgress,Status::Blocked,Status::Closedto denote the issue status. - Type Labels: Use
Type::Bug,Type::Feature,Type::Documentation, etc., to categorize the type of work involved in the issue.
- Priority Labels: Use labels like
-
Do not create custom labels: Stick to the official labels provided in the GitLab dropdown list. Only create new labels on the project level if your project needs this and stick to the conventions.
Recurring Issues
Section titled “Recurring Issues”Overview
Section titled “Overview”This guide explains how to set up and manage automated recurring issues in GitLab.
The script checks for issues labeled Type::cron-job, extracts scheduling information,
and creates new issues based on the specified schedule.
It also closes outdated issues to keep the issue tracker clean.
By making a issue with the Type::cron-job this issue will keep making a issue,
until the issue is manually closed/deleted by a user.
Example
Section titled “Example”For help creating cron expressions, visit: Crontab Guru.
If an issue includes the schedule 0 0 * * 0,
meaning it should create a new issue every sunday at midnight, the script will:
- Create a new issue every sunday at midnight.
- Close the previous issue once the new one is created.
Creating an Automated Issue
Section titled “Creating an Automated Issue”To schedule a recurring issue, follow these steps:
-
Go to the Issues Page
- Navigate to the “Issues” section of your GitLab project.
-
Create a New Issue
- Click ‘New Issue’.
-
Fill in the Issue Details
-
Title: Use a clear title like
Automatic issue for the weekly meeting (template).- The brackets() in the title are optional. But they can be handy so everyone knows that noting important is in the issue.
- Everything you put between brackets in the title will be removed in the task that is created and be replaced with: (created from Cron template issue: (link to the template issue))
-
Description: Add a cron schedule and description. It can be useful to add a description to the issue but it is optional. The cron label is required! If you think the issue needs more info add a description to make it more clear. The
cron:part can be anywhere in the description. It just needs to be on it’s own line. Example:Terminal window Some useful information for the issue.cron: 0 0 * * 0This is the weekly issue for the weekly meeting. -
Make sure you add the cron statement directly after the cron: part. Otherwise the script will not find the cron statement.
-
Label: Assign the label
Type::cron-job.
-
-
Submit the Issue
- Click ‘Submit issue’.
The next time the script runs it detects a new or changed cron expression in the template issue, it’ll add a comment:
cron-job template issue detected. Next 3 invocations will be at:
2025-11-17 21:45:00 UTC2025-11-17 21:50:00 UTC2025-11-17 21:55:00 UTC
The instance issues will be created on the day they’re supposed to be executed. Or, if the cron script didn’t ran for a while, will catch up at its first run.
Using above example the script will make the issue with:
- title:
Automatic issue for the weekly meeting (link to the template issue). - description:
This is the weekly issue for the weekly meeting. - label associated:
Type::BotLabel
Discussion Issues
Section titled “Discussion Issues”If you wish to ask a question or initiate a discussion via GitLab, you can create an issue with the “discussion” label. This issue can then be used to pose your question or facilitate the discussion.
When submitting the initial information for the question or discussion, ensure that you tag a relevant person by using the @mention functionality within a comment thread. Tagging someone ensures they are notified and understand that a response is expected. The DC-bot will also track discussion issues and assign them to the tagged individuals who have not yet responded. For more information about the bot, you can visit the dc-bot page.
Once the question has been answered or the discussion has taken place, the issue can be closed. If necessary, new issues can be created to document outcomes or follow-up actions. Please ensure that issues are closed appropriately to maintain a clean and organized issue management system.
Support desk
Section titled “Support desk”Email address connection
Section titled “Email address connection”- Activate the service desk from the Gitlab project settings (example).
- Setup a
support@email inbox as described in the e-mail server instructions and make itforward to the email address generated by Gitlab. - Setup the “Configure a custom email address” section .
Automation
Section titled “Automation”Support projects can be configured through md files like the one from
its-support
so all incoming support issues obtain urgent priority and
several team members can be notified.
Make sure that after the Default.md is merged in main, it’s configured as
Template to append to all Service Desk issues from the Gitlab project settings.
General Settings > Service Desk.
Notifications
Section titled “Notifications”Announce any new support issues on Mattermost. Usually in the #support channel.
For this, setup an integration example
with Mattermost.